
The bathroom should be a place of refuge and relaxation where you can enjoy a clean and refreshing space for you and especially for your kids. If, instead, your bathroom is a refuge for mold, then stay tuned for a little bathroom mold removal advice.
The bathroom should be a place of refuge and relaxation where you can enjoy a clean and refreshing space for you and especially for your kids. If, instead, your bathroom is a refuge for mold, then stay tuned for a little bathroom mold removal advice. Over time, mold and mildew build up on bathroom caulk, which can be a pain in the ass to remove. It’s not only a health hazard, it’s irritating and also look bad too.
There are different steps you can take to remove the mold from bathroom. You can use the steps below to remove it overnight or you can start fresh and actually remove the old caulking and apply new. Those simple steps are further below the page.
Just remember: The Best Way to Remove Bathroom Mold is to Prevent It
So what’s the best way to get rid of mold in your bathroom? Well, don’t let it grow in the first place. That’s how! Mold needs the right conditions to thrive, including moisture, humidity, and organic material as a food source for mold.
Remove the mold but leave the caulking:
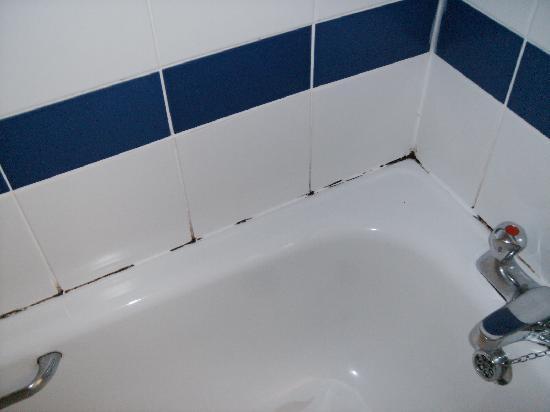
Often, you may notice that mold collects at the edge of the tub, like this:
It may because the caulking isn’t the right kind or water is left there for too long. Either way, you can remove the mold with these steps:
You will need:
Paper Towels (or cotton coil – shown below, if you have it)
Bleach
1 pair of Disposable Gloves
Steps:
1. Get a disposable aluminum pan or use something to pour the bleach in *avoid using plastics*. The goal here is to pour in the bleach so you can dip the paper towels in it.
2. Tear apart the paper towels and roll each one into what can only be described as a fruit roll-up (or cotton coil, shown on the right). This is so they sit on the mold easily. If you have cotton coil fine, I think paper towels work just as good.
3. Dip the paper towels in the bleach and lay them directly on the mold, pushing them into the crevices.
4. Let the paper towels sit on the mold overnight. Done!
You now have a clean, sparkly tub.
If the caulking is too far gone and it needs to be replaced, removing and replacing moldy or mildewed caulk is relatively simple. Keep in mind, though, that different types of caulk may be more or less appropriate for your project depending on your preferences for ease of application and removal, the substrate and the mold levels.
Start fresh! Remove the mold and the caulking:
There are different types of caulking, so let’s take a look.
Acrylic caulk is the best caulk for repelling mold and dirt. Acrylic caulk can be either water-based or siliconized, which allows you to choose the best application, substrate and durability preferences. All acrylic caulks have good adhesion, flexibility and lifespan, and are designed to not only repel mold but also to remain bright white over time. All-acrylic water-based caulks are especially versatile since they can be painted with many different types of paint. Keep in mind that acrylic caulks tends to be more expensive than other types of caulks.
We use Silicone-Based acrylic caulking and it works great.
Generally speaking, silicone-based caulks are the best caulks to use in mold-friendly environments like bathrooms. Since silicone is inorganic, it is extremely mold, mildew and water resistant. Additionally, silicone-based caulk is idea for substrates commonly found in bathrooms such as ceramic tile, porcelain and glass.
Removing mold from grout
To properly remove mold from grout, you must use a cleaning solution that creates an environment that is hostile to mold. Most products do this by raising or lowering the ph, or through a chemical process that breaks down the mold’s molecular structure. Not to get all nerdy on you, however.
Since grout has little nooks and crannies where mold can hide, especially if it isn’t sealed well, you want to use more than just detergent. Below are bathroom mold removal heroes when it comes to killing and removing mold from grout:
- Rubbing Alcohol or Denatured Alcohol
- Commercial mold removal product (always follow manufacturer’s instructions on the label)
- Distilled Vinegar
- Borax Solution (1 gallon of water to 1 cup of borax, or 1 part borax to 16 parts water)
- Baking Soda -Detergent Solution (1/2 cup baking soda, 1 cup water, 1 Tbsp mild liquid detergent)
- Bleach-Detergent Solution (1 part household detergent, 10 parts bleach, and 20 parts water)
Warning:
Never mix bleach with a product that contains ammonia. It will produce toxic fumes that can cause serious illness or death.
Step 2 – Put on Protective Clothing and Make Safety Precautions
Before starting, make sure this project is small enough to do it yourself. Because you are working with mold, we recommend the following protective clothing:
- A respirator, or air mask, that is adequate for blocking mold spores from entering your lungs. The EPA recommends a N95 mask or equivalent.
- Rubber or Nitrile gloves.
- Safety goggles that do not have air vents in the sides.
- If you are moderately sensitive to mold exposure, we recommend wearing coveralls to protect your skin as much as possible. If you are severely sensitive to mold exposure, we recommend getting somebody else to perform the task.
If you are using a product that has strong or dangerous fumes, also make sure your are working in a well ventilated room.
To see more on how to prepare to remove mold, click here.
Step 3 – Apply the Mold Removal Solution and Scrub
Apply the mold cleaning solution that you have elected to use. You can do this with a spray bottle, a lightly damp rag, or a low-abrasive sponge or pad. With grout, it is best to use a flexible brush, such as a toothbrush.
Apply the mold removal solution generously.Let the solution sit for a few minutes, then scrub the area in circular motion with your brush, or a scrub pad. Be sure to get the bristles into the grout as much as possible. This will both remove the mold from the grout, and spread the solution into the little nooks and crannies to help prevent the mold from growing again. Using a disposable towel, or a regular cloth towel (that you can disinfect with bleach later), wipe off the area and the excess. Do not rinse the area too much since you want some of the cleaning solution to dry into the grout. This will help prevent that pesky mold from reemerging.
Continue this process until the mold is removed from the surface.
Step 4 – Clean Up and Let Dry
Now that you successfully attacked this bathroom mold, clean up the grout lightly with a rag and either dispose anything that has had contact with the mold, or clean it with a proper detergent or fungicide.
Let the area dry by keeping it warm and dry with good ventilation. If you live in an area with higher humidity, you may want to place it in a room with a dehumidifier.
Step 5 – Check for Signs of Remaining Mold
If mold begins to reappear in the next few weeks, it is probably because your bathroom mold has a good environment for it to thrive. Look for ways to improve air circulation, perhaps by opening a window or running a fan or dehumidifier. If this isn’t possible, the only other prevention method is clean the grout with a mild cleaner more frequently. This will disrupt the mold growth process and prevent it from getting established. When cleaning mold off of grout, remember to use a cleaning solution, such as bleach, borax, or vinegar, which create an environment that grout mold dislikes.
If the mold reappears, repeat steps 1 through 5.
We hope this was helpful, and good luck in your grout and bathroom mold removal ! Please feel free to leave a comment or question below.
Just make sure to open a window and turn on a fan when cleaning. You won’t need to do this often but when you do, tackle it with all you got to get the job done quickly.